I've done my Tutorial 4 regarding the understanding of advance techniques of layering effects, applying stroke style effects and color editor, using channel tool to apply the effects and applying blending on layer image as part of background effect techniques
I learned so many things in learning this tutorial 4...
This will help me in progressing of my assignment 2...
So, here are my working process in the making of tutorial 4.....
--------------------------------------------------------------------------------------
Step-By-Step
-I start this exercise with imported the main image to the background layer...
-Then, I click on View->Actual Pixels to view the image in the more details...
-I choose the Ink Vectors layer to make some modification to it...
-I then, click the Gradient Overlay to make some adjustment...
-I double click the most left arrow button and the most right arrow button at the color bar to change the color base on what I desired to be...
 -use Gradient Overlay-
 -changing the colour-
-At the gradient overlay box, I changed the angled of the gradient to be -90 degree..
-The effect will changed the colour position (the darker green will be ontop and the lighter green will be at the bottom)...
-The effect will changed the colour position (the darker green will be ontop and the lighter green will be at the bottom)...
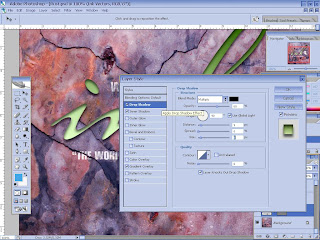
-Then, I'm choosing the Inner Shadow layer style to make some adjustment...
-I set the angle of the light source to be 90 degrees...
-Then, I changed the opacity of the shadow to be in smaller percentage...
-After that, changed the size of the shadow and also the distance to be around 10px...
-Then, I choose the drop shadow layer effect style...
-I changed the distance and also the size of the shadow...
-After that, I choose the outer glow layer style to this exercise...
-I changed the glow colour from yellow to black...
-Then, I changed the blend mode to be multiply...
 -choose the outer glow layer style-
-Moreover, I choose the Bevel and Emboss layer style to make the words to be more interesting...
-I changed the altitude to be 75 degrees...
-I set the opacity of highlight to be in maximum position which is 100%...
-Then, I set the opacity of shadow to be in minimum position which is 0%...
-I also using the contour style in the subdivision on Bevel and Emboss layer...
-I set the range of the contour and choose anti-aliased to get the smooth surface..
-In the texture section, I choose the woven pattern to be apply at the text..
-I drag the style that I've already done in Ink Vector Layer to be drop at the style layer to make the new style mode...
-I rename the style layer to be Green Drop Layer Style...
-Then, I click the Ink Splat 1 layer to be modify by me...
-I choose the Green Drop Layer Style that I've created before to be same apply to this layer...
-I make some changes in the style by using the drop down option in the layer...
-Same goes to the Ink Splat 2 layer...
-I apply the same techniques but this time, I changed the colour to be yellowish to make it looks different each other..
-In the texture layers, I unchecked the Link Texture with Layer box, so that the background and the layers are well blend to be in single layer...
-Then, I click snap to the origin...
-I make the layers to be invisible...
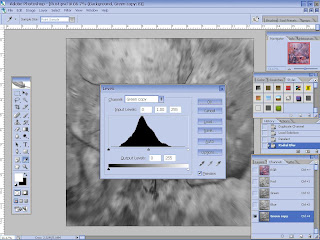
-Then, I click the channel layers to make the layers in 3 different mode which is Red, Green and Blue mode...
-I'm interested using the Green mode, so I make the duplicate layer for the green mode, so that it won't effect the original layer...
-I choose radial blur for the layer rather than Gaussian Blur...
-Then, I use the Level channel (CTRL + L) to edit the balancing of the blur effect..
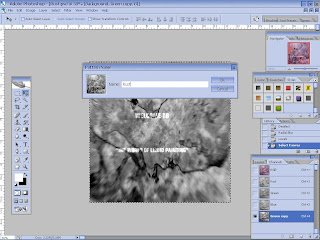
-I'm creating the new patter layer by using the Edit -> Define Pattern...
-Then, I rename it to Rust..
-Then, I'm using the Rectangle Tools...
-After that, I set it to Shape Layers...
-I'm applying the style that I used to the Splat Drops which is the Green Drops style...
-I'm creating the layer mask into the shape layer...
-Then, I apply the layer mask Thumbnail...
-I use the CTRL + Backspace shortcut to make it set to black...
-I used the brush tool to create the area effect for the image...
-I set the brush to maximum sharpness...
-I'm choosing the Blending Option Custom to make the layer are well blend together...
-Then, I check the box of the Blend The Interior Effect As Group...
-After that, I set the interior opacity for the layer to be minimize...
-This will make the layer looks like icy...
-I set it as my desired looks of icy layer...
----------------------------------------------------------------------------------------
Final Output
-To make it more nicer, I change it into invert mode to make it looks in different style...
-So, after I satisfy all my work done, I convert it into .JPEG format....
-This is my Icy Ink Tutorial this week....
-Mission Accomplish! :D


2 comments:
Good job.
Thanx Madam... :)
Post a Comment